• >> See all Pottery Wheel Posts
    • Pottery Wheel Buyer's Guide
    • Tabletop Pottery Wheels
    • Pottery Wheel Comparison Chart
    • Best Pottery Wheel Stools
    • Brent Wheels Buyer's Guide
    • Nidec-Shimpo Wheels Buyer's Guide
    • Best Pottery Wheel Bats
    • Best Throwing Sponges
    • Pottery Aprons
    • >> See all Tool Reviews
    • Gift Guide for Potters
    • Best Masks
    • Best Aprons
    • Best Scales
    • Banding Wheels
    • Best HEPA Vacuum
    • Best Wet Polishers
    • Cleanup Tools
    • Sandpaper and Abrasives
    • Best Glaze Mixing Tools and Accessories
    • Handheld Extruder Buyer's Guide
    • Tools for Home and Studio
    • Cut Off Wire
    • Hand Creams for the Studio
    • Best Tools for Pottery Beginners
    • Heavy Duty Cleanup Sponges
    • >> See all Glaze posts
    • Cone 6 Glossy Clear Glaze
    • Cone 6 Milky Clear Glaze
    • Cone 6 Ultramarine Blue
    • Cone 6 Lava Glaze Silicon Carbide Grit Tests
    • Cone 6 Bisque Crackle Slip
    • Cone 6 Pussy Willow and Blueberry Hill glazes
    • Cone 6 Cobalt Blue
    • Cone 6 Kiln Wash
    • Spectrum Underglaze Cone 6 Test Tiles
    • AMACO LUG Underglaze Cone 6 test tiles
    • AMACO Velvet Underglaze cone 6 test tiles
    • Speedball Underglazes Cone 6 Test Tiles
    • >> See all How-To posts
    • Mix a Ceramic Glaze from Scratch
    • How to Reclaim Clay in a Small Studio
    • Make Colorful Pancake Paintings
    • Make a Grinding Disc for Your Wheel
    • Make a Cut Off Wire for Wedging Tables
    • Eliminate Ceramic Slop Bucket Odor
    • Make a Simple Booklet
    • Use and Clean Up Wax Resist
    • Make a Metal Pottery Rib
    • Make a Plastic Pottery Rib
    • >> See all Painting and Drawing
    • Gift Guide for Painters
    • Colored Pencil Buyer's Guide
    • Best Chunky Colored Pencils
    • Best Mixed Media Sketchbook
    • Best Black Paper Sketchbooks and Drawing Pads
    • Best Black Acrylic Gesso
    • >> See all Inspiration posts
    • Georgia O'Keeffe on Making "Ordinary Paintings"
    • John Baldessari on Cheap Art
    • Louise Nevelson on Making Art
    • Matisse on Drawing Trees
    • Plato on the Role of Potters
    • Ceramic Textbooks and Guidebooks
    • Centering by M. C. Richards
    • Shoji Hamada on Making Pots
    • A Potter's Workbook by Clary Illian
    • Roger Herman Ceramics monograph
    • Ben Okri: A Time for New Dreams
    • About
    • Privacy Policy
Menu

The Studio Manager

Street Address
City, State, Zip
Phone Number

Your Custom Text Here

The Studio Manager

  • Pottery Wheels
    • >> See all Pottery Wheel Posts
    • Pottery Wheel Buyer's Guide
    • Tabletop Pottery Wheels
    • Pottery Wheel Comparison Chart
    • Best Pottery Wheel Stools
    • Brent Wheels Buyer's Guide
    • Nidec-Shimpo Wheels Buyer's Guide
    • Best Pottery Wheel Bats
    • Best Throwing Sponges
    • Pottery Aprons
  • Tools
    • >> See all Tool Reviews
    • Gift Guide for Potters
    • Best Masks
    • Best Aprons
    • Best Scales
    • Banding Wheels
    • Best HEPA Vacuum
    • Best Wet Polishers
    • Cleanup Tools
    • Sandpaper and Abrasives
    • Best Glaze Mixing Tools and Accessories
    • Handheld Extruder Buyer's Guide
    • Tools for Home and Studio
    • Cut Off Wire
    • Hand Creams for the Studio
    • Best Tools for Pottery Beginners
    • Heavy Duty Cleanup Sponges
  • Glazes
    • >> See all Glaze posts
    • Cone 6 Glossy Clear Glaze
    • Cone 6 Milky Clear Glaze
    • Cone 6 Ultramarine Blue
    • Cone 6 Lava Glaze Silicon Carbide Grit Tests
    • Cone 6 Bisque Crackle Slip
    • Cone 6 Pussy Willow and Blueberry Hill glazes
    • Cone 6 Cobalt Blue
    • Cone 6 Kiln Wash
    • Spectrum Underglaze Cone 6 Test Tiles
    • AMACO LUG Underglaze Cone 6 test tiles
    • AMACO Velvet Underglaze cone 6 test tiles
    • Speedball Underglazes Cone 6 Test Tiles
  • How To
    • >> See all How-To posts
    • Mix a Ceramic Glaze from Scratch
    • How to Reclaim Clay in a Small Studio
    • Make Colorful Pancake Paintings
    • Make a Grinding Disc for Your Wheel
    • Make a Cut Off Wire for Wedging Tables
    • Eliminate Ceramic Slop Bucket Odor
    • Make a Simple Booklet
    • Use and Clean Up Wax Resist
    • Make a Metal Pottery Rib
    • Make a Plastic Pottery Rib
  • Painting
    • >> See all Painting and Drawing
    • Gift Guide for Painters
    • Colored Pencil Buyer's Guide
    • Best Chunky Colored Pencils
    • Best Mixed Media Sketchbook
    • Best Black Paper Sketchbooks and Drawing Pads
    • Best Black Acrylic Gesso
  • Inspiration
    • >> See all Inspiration posts
    • Georgia O'Keeffe on Making "Ordinary Paintings"
    • John Baldessari on Cheap Art
    • Louise Nevelson on Making Art
    • Matisse on Drawing Trees
    • Plato on the Role of Potters
    • Ceramic Textbooks and Guidebooks
    • Centering by M. C. Richards
    • Shoji Hamada on Making Pots
    • A Potter's Workbook by Clary Illian
    • Roger Herman Ceramics monograph
    • Ben Okri: A Time for New Dreams
  • About
    • About
    • Privacy Policy

How to Ship Ceramics, Sculptures, and Other Heavy or Fragile Objects

November 15, 2022 Matt M-H
One box nested inside another with packing peanuts, a safe and effective way to ship fragile objects such as pottery, ceramics, and sculptures

The double-box method is the best way to ship ceramics and other fragile objects.

Shipping ceramics or any fragile object can be a daunting task. But with this guide, you should get all information you need to become a shipping expert.

This post includes

  • Guide to packing and shipping fragile objects using the “double box method.”

  • Recommendations on tape, boxes, wrapping materials, and void fill.

  • Guide to shipping scales

  • Review of thermal packing label printers

Let’s dive in to packing and shipping first.


How to Pack and Ship Ceramics, Sculptures, or other Fragile Objects


This is the best method to pack your ceramics and other fragile objects to insure that nothing is broken or damaged during shipping. The method uses two nested shipping boxes.

Start by wrapping your object with Ranpak Ready Roll (shop at Amazon), bubble wrap, or tissue paper. Then pack the wrapped object into a box with packing peanuts or foam, so that it is surrounded by about 2 inches of packing material on all sides. Give the box a light shake to insure it’s tightly packed and nothing movs. Then, place this box inside a box that gives another 2 inches of packing room on all sides and once again, make sure it is packed tight enough so that nothing moves.

This method results in around 4 inches of packing material surrounding the object in each direction, giving you plenty of assurance that you can ship via the postal service, FedEx, UPS, DHL etc, and your sculpture or pottery will be fine.

Here’s a detailed how to of this method with pictures.

Two flattened cube boxes 8 inch and 12 inch size, will be assembled and used for packing and shipping ceramics using the double box method.

Step 1: Select boxes that will nest

After always having random boxes around, I’ve found it useful to stock boxes I know will nest. In this example, I’m going to use an 8x8x8 inch box that will pack into a 12x12x12 inch box, giving equal space on all sides.

Shop shipping boxes at Amazon
 

After taping the bottom, you can always double check to make sure the boxes will nest.

Two brown cardboard boxes, 8 inch and 12 inch, assembled and nested together before packing, to show the amount of room recommended for safely shipping ceramics

Step 2: Wrap Object

A yellow and tan stoneware flask with a cork sitting on the double-layer Ranpack brand packing material, which is white tissue paper on top of a layer of perforated brown packing paper.

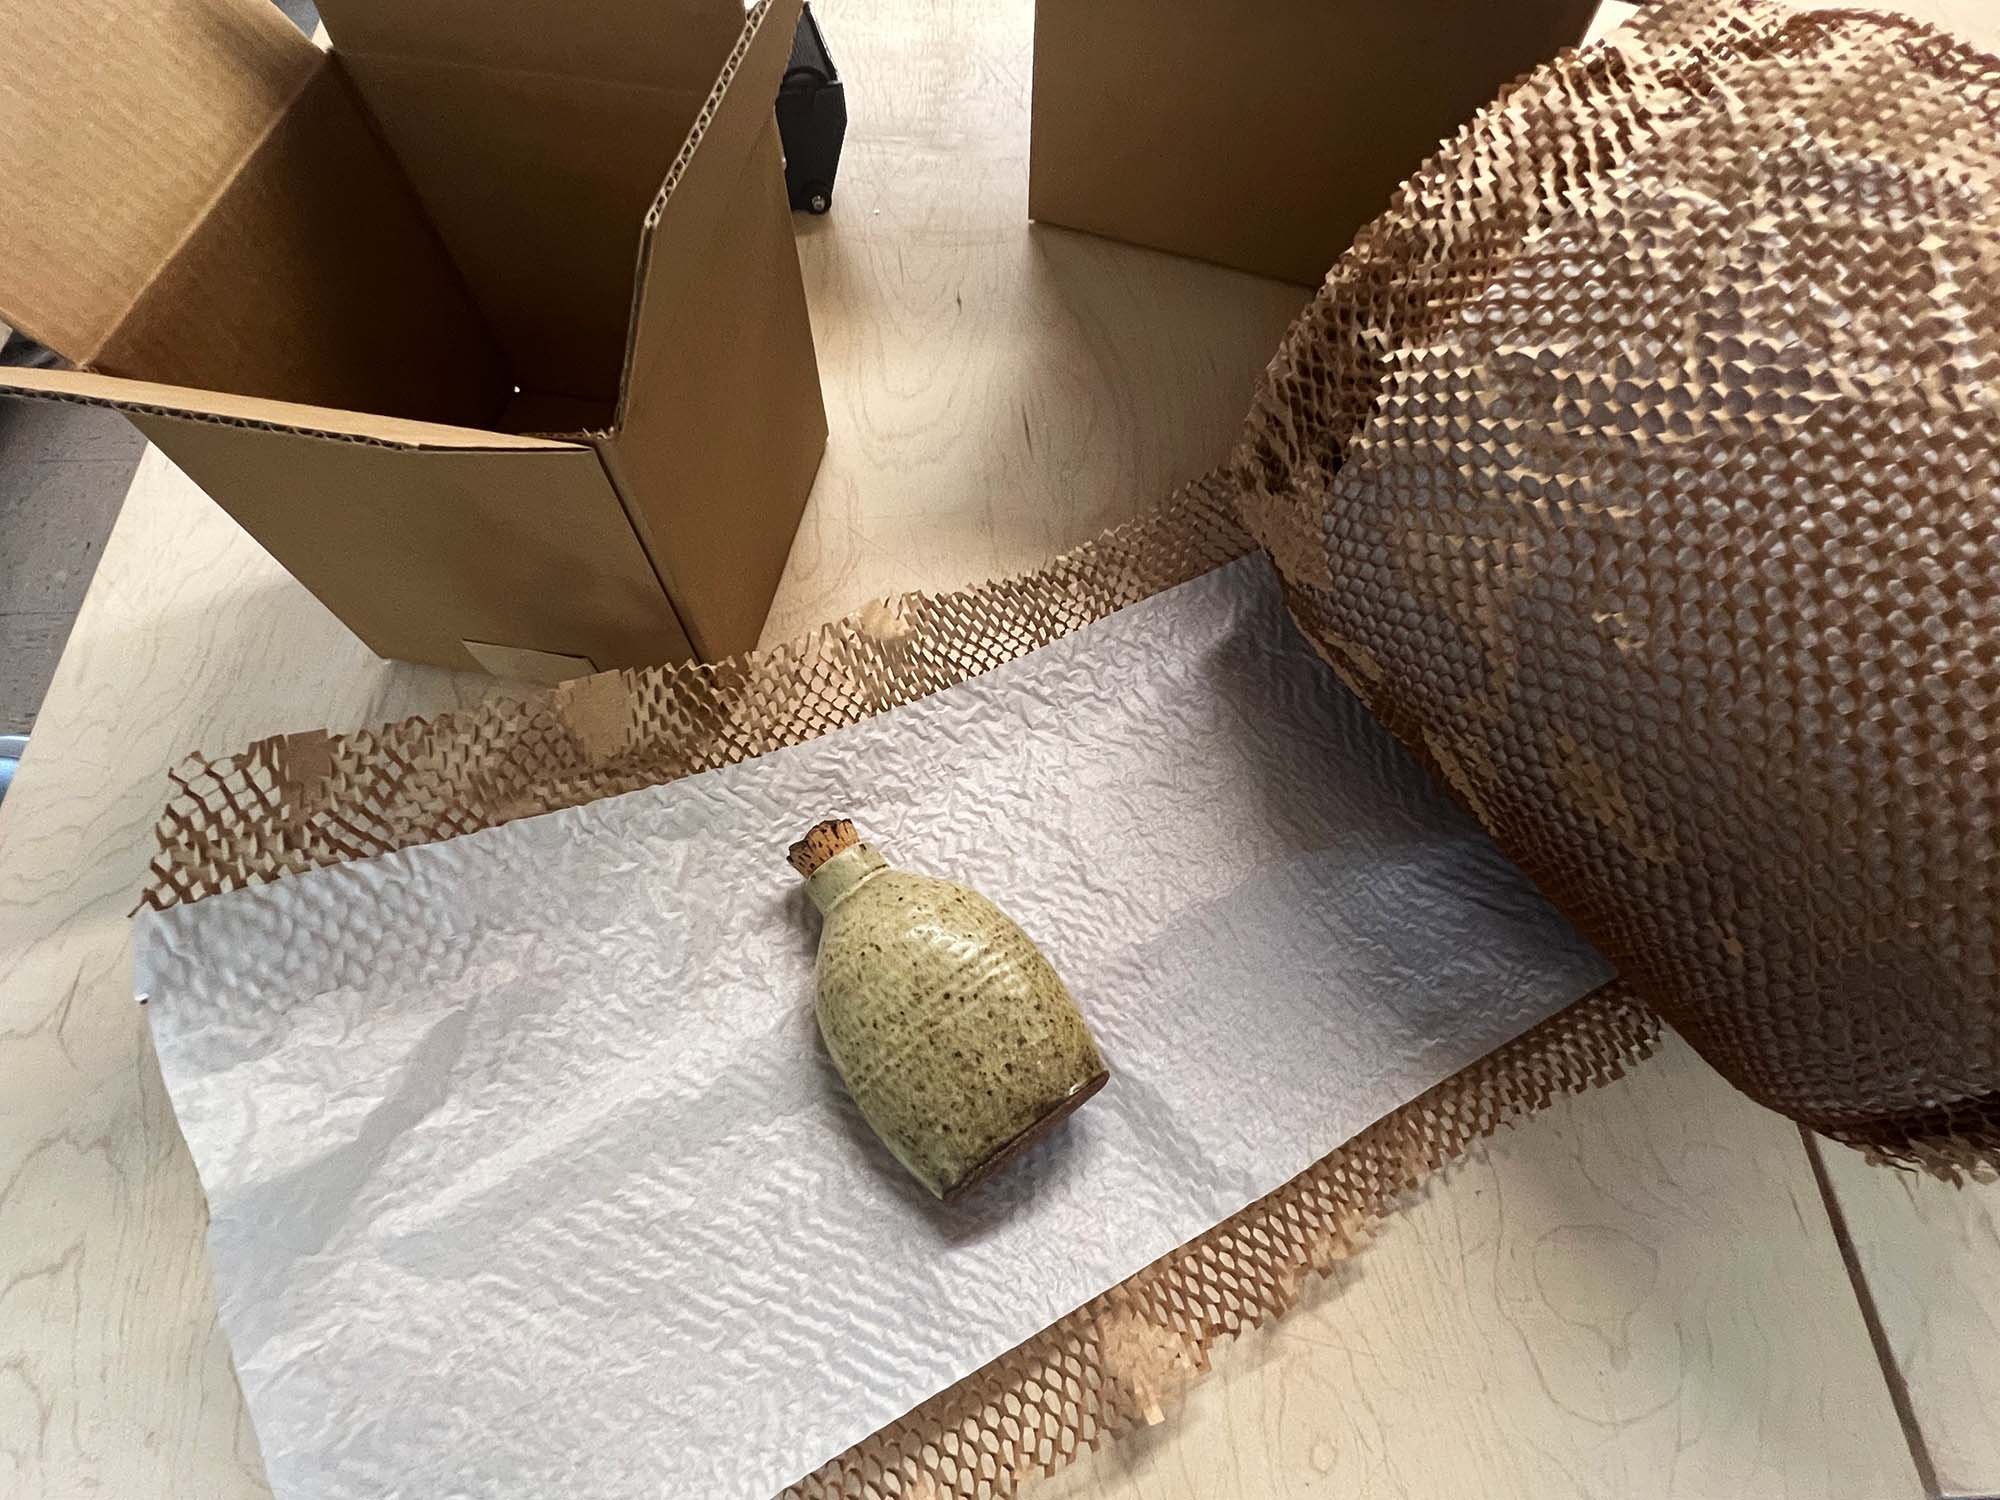
A stoneware flask ready to be wrapped in Ranpak packing material.

In this example, Ranpak is used for the initial wrap. It’s perfect for ceramics, and can be reused or recycled easily.

I usually avoid tape if possible, so it’s easier to reuse the packing material, and another bonus with Ranpak is it will sort of “grip” the opposite side and stay wrapped on it’s own.

Shop Ranpak Ready Roll at Amazon

Shop Ranpak Ready Roll at Staples


Step 3: Packed Wrapped Object in First Box

A ceramic object wrapped in Ranpack nested in biodegradable packing peanuts, inside a small brown cardboard box.

The Ranpack-wrapped ceramic nested inside packing peanuts, inside the smaller box.

Next, put some packing material on the bottom of the first box, put your wrapped object in, and fill until it’s full and nothing moves when you close and shake the box. If it all seems good, tape it shut.


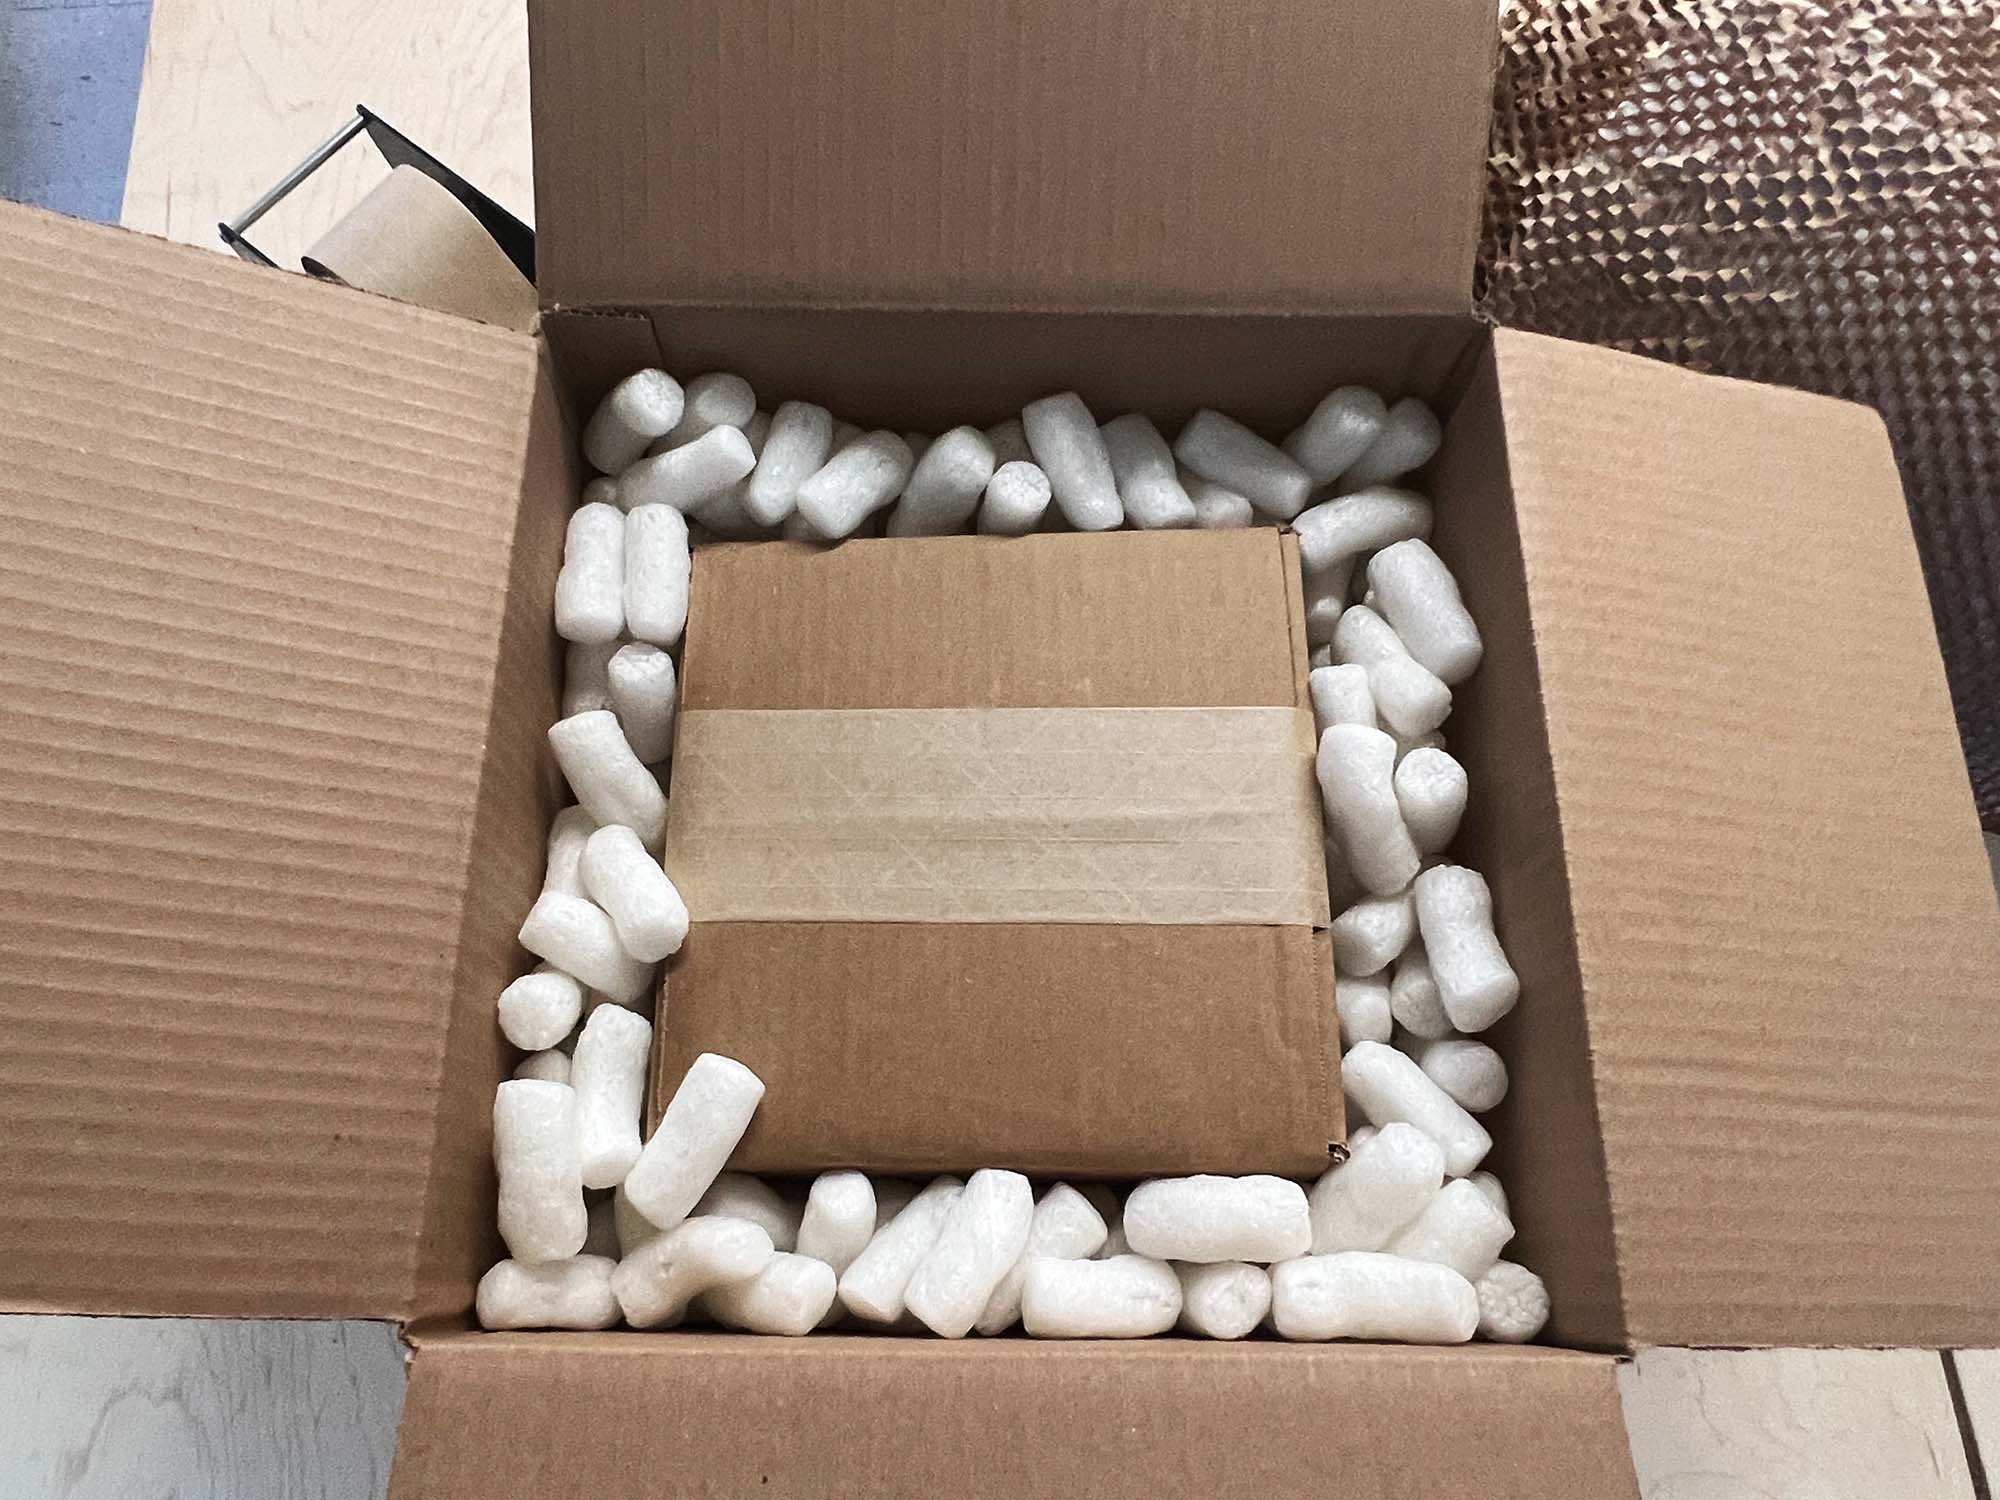
Step 4: Pack first box inside larger box.

About 2 inches of packing peanuts at the bottom.

Start with about 2 inches of packing peanuts at the bottom of the larger box, place your sealed first box inside, and then fill with more packing materials. You may need to push some material down the sides, to make sure you pack everything tightly.


Place packed smaller box inside.

Fill sides with packing materials.

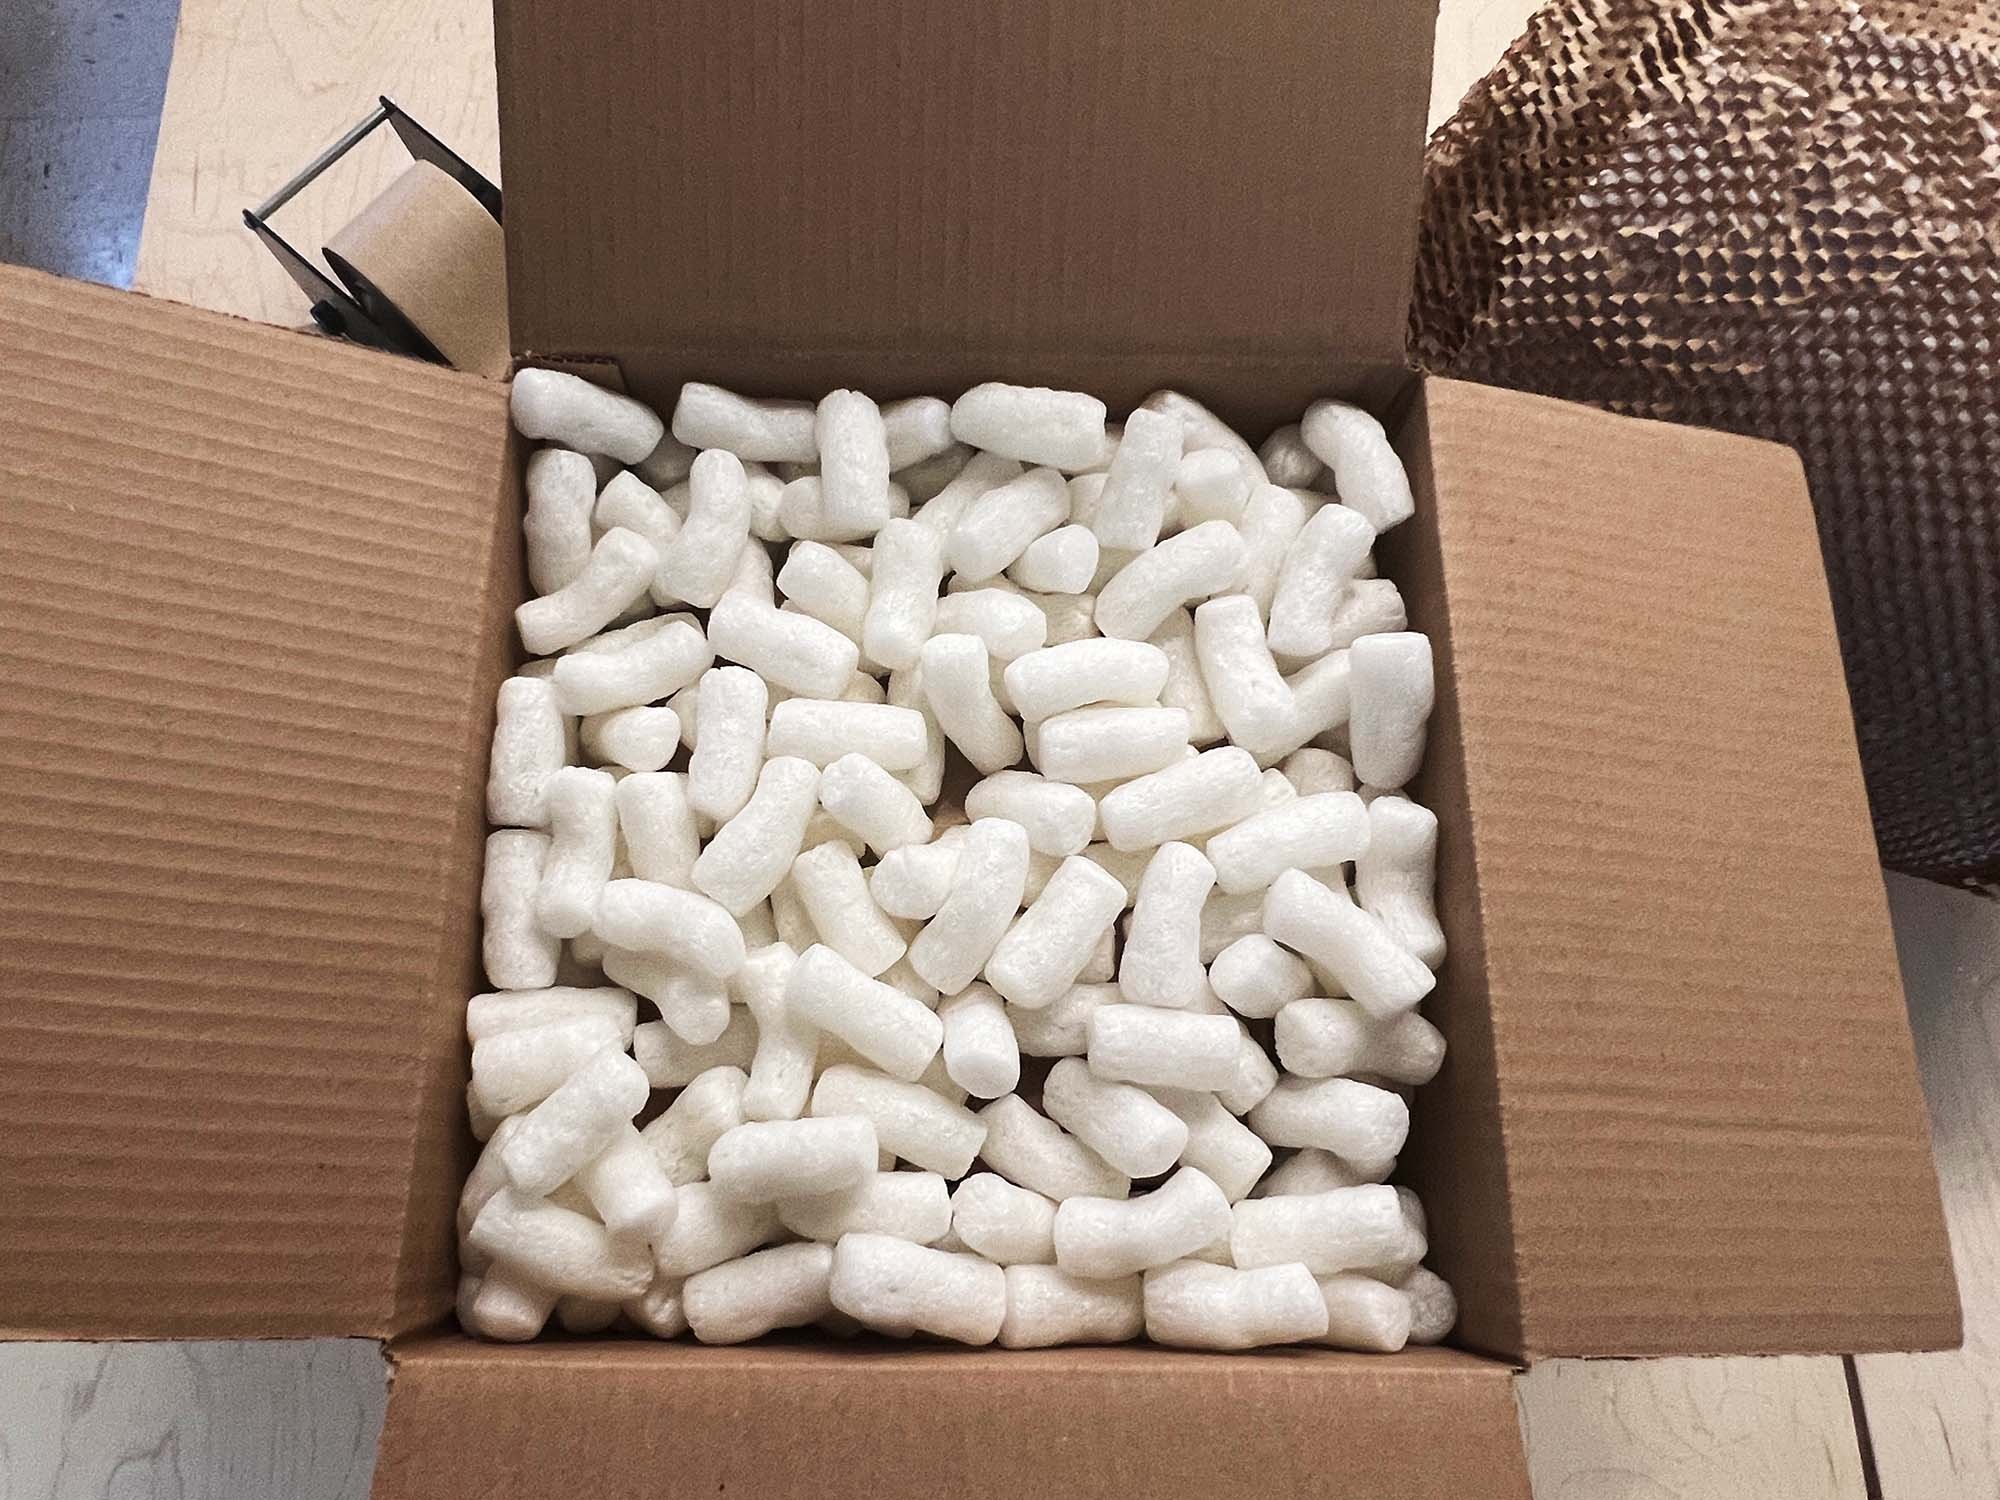
After making sure sides are well packed, place material on top.


Step 5: Seal and label your box

That’s it! You’ve packed your box. Close it and give it a test shake. If nothing moves, seal the box shut and then you are ready to attach a label.


Guide to tape, boxes, wrapping materials, and void fill

Here’s a few hints on tips on materials for your shipping needs.

Tape

Gummed paper tape in a Paper Mart brand dispenser at top, Scotch Heavy Duty tape in a dispenser at bottom.

For shipping, you have two options: plastic shipping tape and Kraft tape also known as gummed paper tape.


Plastic shipping tape is pretty straight forward and dependable. It’s easiest to use with a quality tape gun or dispenser. The main drawback is that it’s not easy to recycle. Within the plastic tape category, you have packing tape, regular shipping tape, and heavy duty tape. Some of the basic tapes can be pretty thin and weak (and sometimes don’t dispense easily) so for my studio I go with Scotch Heavy Duty shipping tape. I’d rather not fight with the tape. Mostly, I use the clear tape for covering labels.

Shop Heavy Duty shipping tape at Amazon
Shop Shipping tape at Staples

Paper Mart brand gummed tape dispenser. A metal unit with a small plastic reservoir for water, with brown water-activated gummed Kraft tape

The Paper Mart Kraft tape dispenser.

Kraft shipping tape or gummed paper tape is a nice option, but it does take some set up for easy use. It’s super strong, looks great, and can be used to patch older boxes. (Unfortunately, Kraft tape with fiberglass reinforcement is not recyclable.) The only drawback is that you have you have to activate the gum with water.

For occasional shipping needs, you can cut the tape with scissors, then apply water with a sponge. This makes a bit of a mess on your table but it works.

If you are shipping more often, a tape dispenser with a water reservoir is very helpful. In my studio, I use the basic Paper Mart Kraft tape dispenser, but there are higher tech models out there. All of them help you dispense, wet, and cut the tape.

Shop Kraft tape dispenser at Amazon

For Kraft tape, I’ve tried a few options and the most dependable option was the Duck Brand Fiberglass Reinforced Kraft tape. While this tape is not recyclable, it does seal very well and is easy to work with. (I’m currently looking into other recyclable Kraft tape options and will update this post if I figure anything out.)

Shop Kraft Tape at Amazon
Shop Kraft Tape at Staples

Shipping Boxes

When it comes to boxes, there are lots of options for where to buy. Take a look at what you are shipping, and try to stock sizes that work for you. There are plenty of box suppliers online, and there may be a specialty shipping supplier in your area that will deliver without too high of a minimum. Usually, they will have lower prices per box but they will charge shipping. If you are shopping online, a few links are below:

For this double-box shipping method, the standard weight boxes work just fine. But you can also upgrade to the heavy-duty boxes if desired. They have thicker walls and are sturdier.

As mentioned in this post, I used to just have random boxes but when I got more serious about shipping, I started stocking in sizes I knew would nest together. That means, I usually have a variety of boxes ready to go in 8”, 10”, 12”, 14” and 16 inch cubes.

Shop Box USA at Amazon
Shop Shipping Boxes at Staples

Here are the exact boxes used in this pictures above:

Shop 8 x 8 x 8 inch boxes at Amazon
Shop 12 x 12 x 12 inch boxes at Amazon

Void Fill / Packing Peanuts

Along with tape and boxes, wrapping material and void fill are important parts of the shipping set up.

As mentioned, I love Ranpak Ready Roll. It’s tissue paper surrounded by honeycomb-cut brown kraft paper. It’s perfect for wrapping ceramics. If you have something more fragile, you may need to get stiffer foam such as museum foam, and create a custom chamber for your piece. But for my needs, I’m happy with the Ready Roll, which I then surround with biodegradable packing peanuts.

Packing peanuts are available in styrofoam or biodegradable corn starch. The corn starch peanuts cost about the same and are just as easy to use and are reusable, as long as they don’t get wet. For packing peanuts, unfortunately there aren’t a lot of great online options. The bags of peanuts are big and bulky, resulting in a high shipping cost (Some retailers, especially online, list the peanuts with shipping included.) For peanuts, it’s best to go with your local shipping supplier. If you bundle your purchase with boxes and tape, it should be quite economical to get a delivery as needed.

For smaller volumes of peanuts, check the links below.

Shop Packing Peanuts at Amazon
Shop Packing Peanuts at Staples

Other Options for Void Fill

Shipping stores stock a variety of void fill, or you can make your own. Here are a few ideas to fill up space in a box:

  • Crumpled newspaper (although ink can get on things)

  • Sheets of crumpled kraft paper

  • Bubble wrap

  • Ranpak Ready Roll

  • Clean egg cartons

  • recycled bubble mailers


Guide to Shipping Scales

Any scale that is accurate can be used as a shipping scale. Typically, shippers are going to round up to the nearest pound, so your scale doesn’t have to be super accurate. But you want it to work.

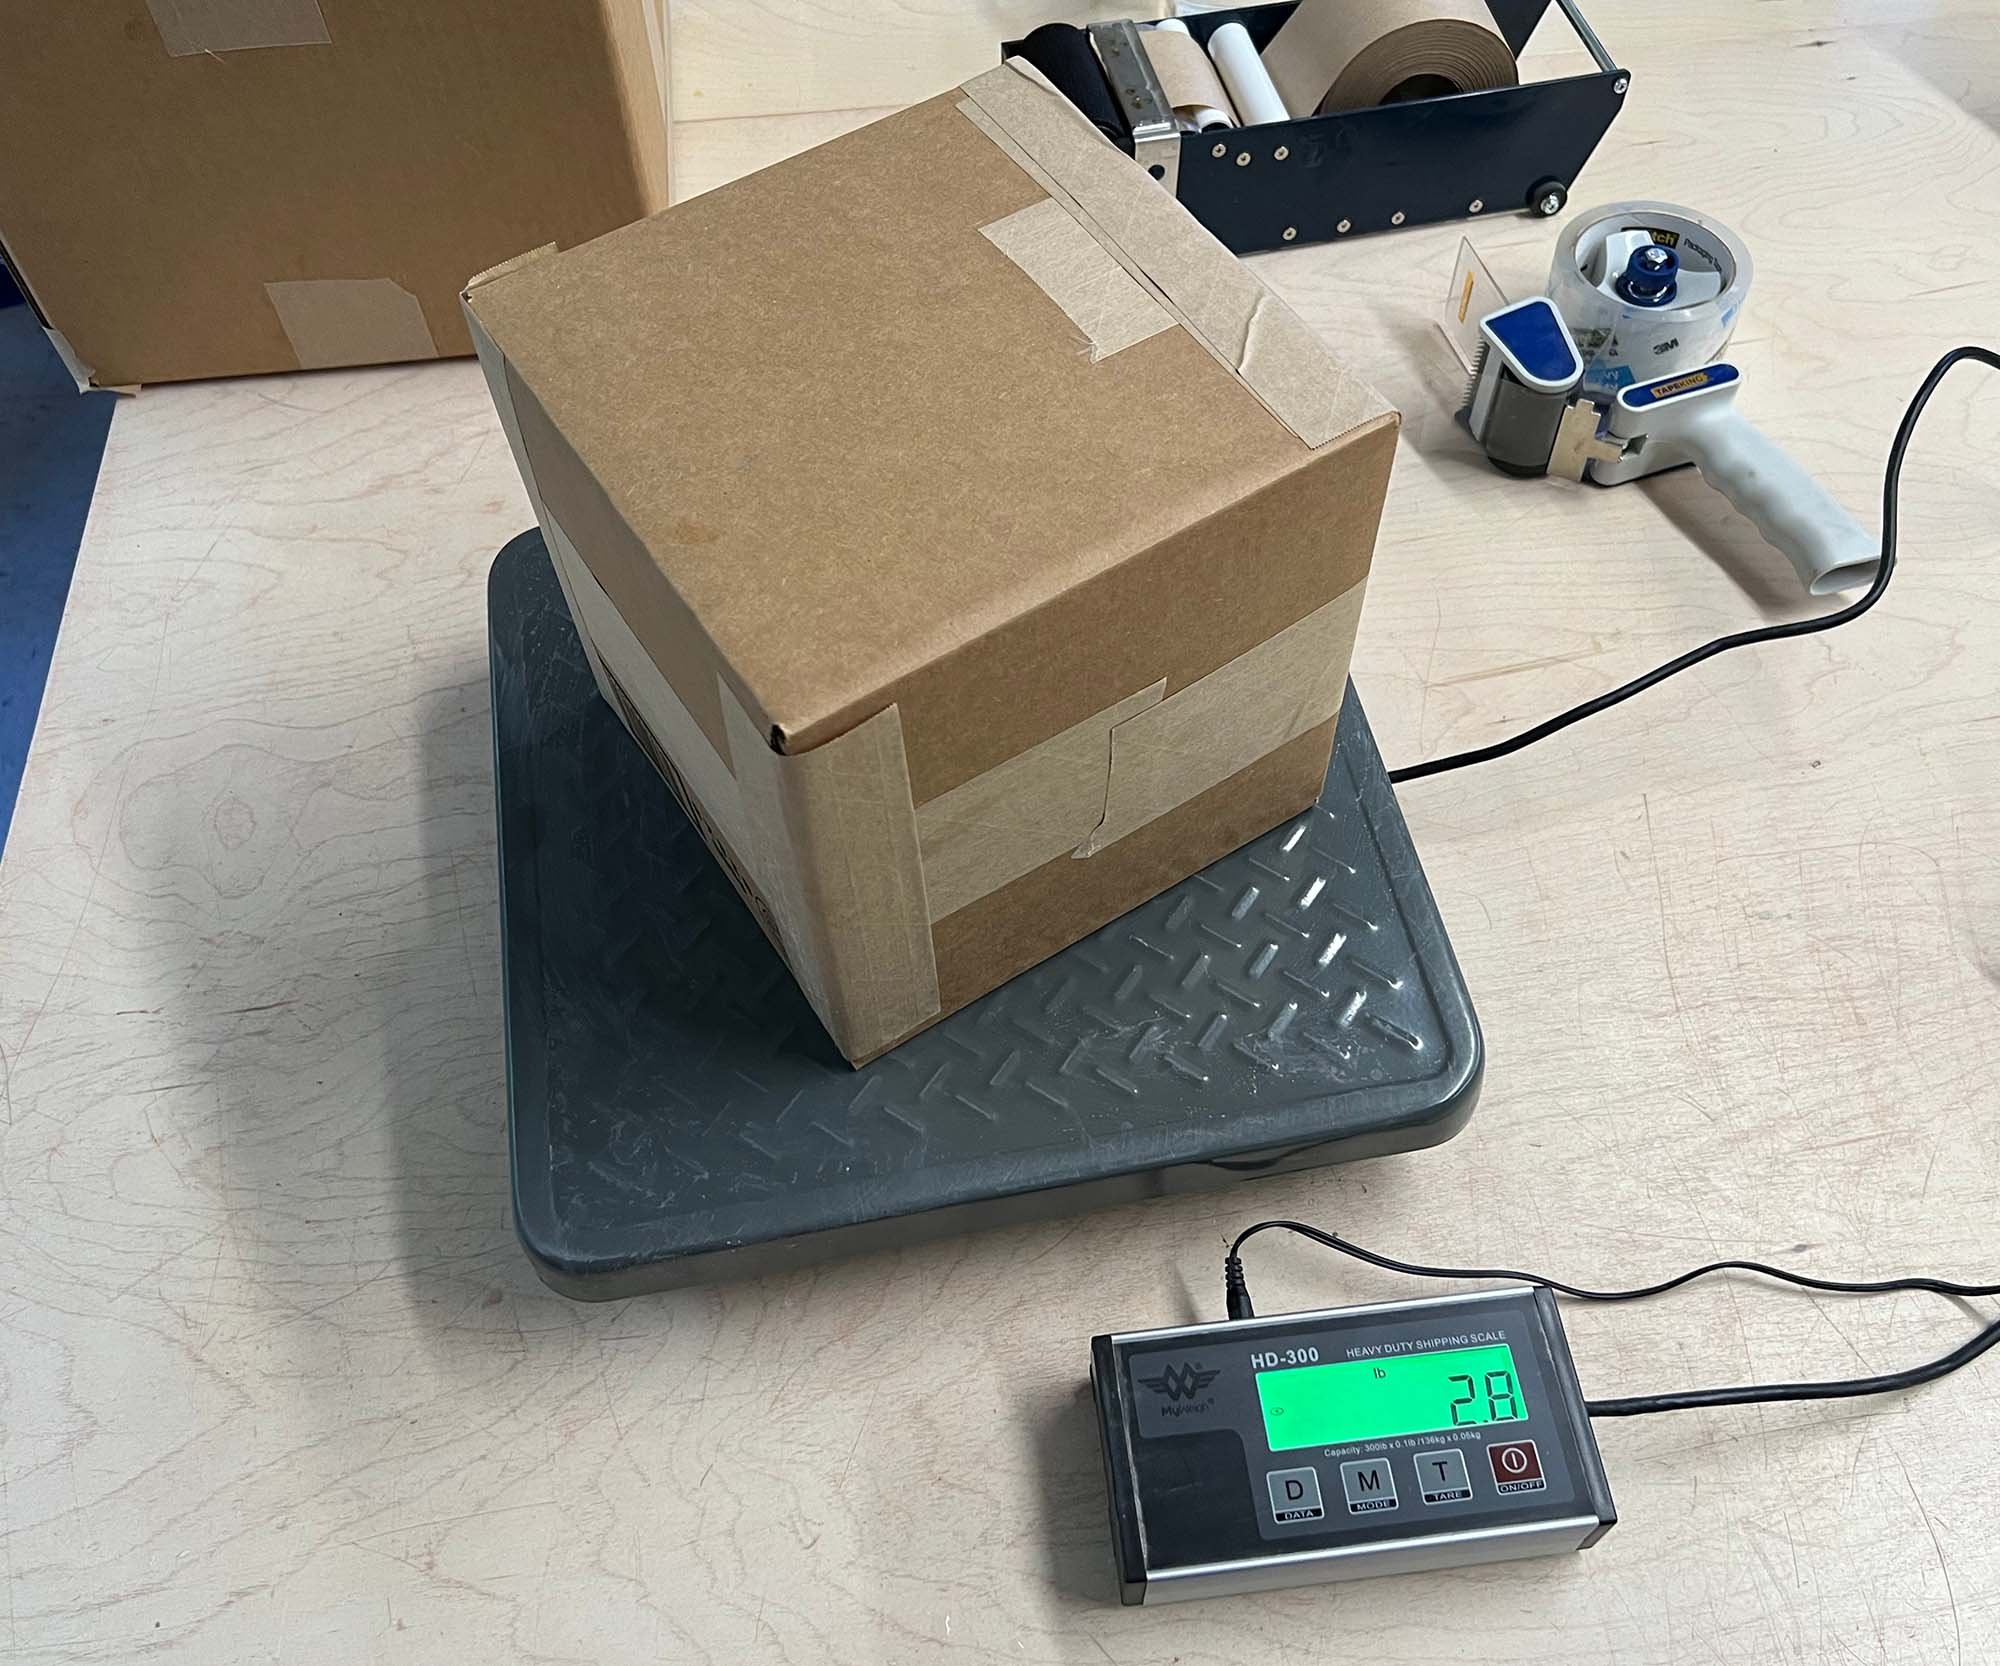
A package on the MyWeigh HD-300 Shipping Scale.

In my studio, I use a dedicated shipping scale, the MyWeigh HD-300. It’s a beefy scale with a metal plate, a detached readout, and can be used with batteries or plugged in. It also doubles as a robust scale for measuring plaster or other large amounts of materials.

For our complete guide to shipping scales, click here.

For a guide to scales for mixing glazes (may also work for small shipping scales) click here.

The MyWeigh HD-300 Shipping Scale retails for around $130.

Shop MyWeigh HD-300 at Amazon

The Accutek scale can be used with batteries or plugged in, and can weigh up to 50 lbs.

For a light-duty scale that can be used for weighing small balls of clay, and small packages, the Accutek all-in-one scale is a great budget option that costs just $20. It has a plastic top, decent build quality, and can weigh up to 50 pounds. It will just be hard to read if your package is wide, as it does not have a detachable screen.

Shop Accutek scale at Amazon

Thermal Label Printers

The Rollo printer with a stack of labels ready to print.

The final piece of shipping set up is a thermal label printer. These printers print in black on 4 x 6 inch stickers that can be used for labels or any use. You don’t need a thermal printer if you are planning to take your package to a shipping service, but it’s a must have if you want to prepare your own labels and drop your packages off or have them picked up.

The Rollo printer opened up, with a stack of labels.

The two main competitors for thermal printers appear to be Rollo and Dymo. In my studio, I went with a plug-in Rollo model and I’ve been very happy. The printer itself is well built, easy to use, and connects to my computer via USB. The extra power source plug is a normal size electrical item, but it is external to the printer.

For me, it took a bit of effort to get everything to work on the computer end (I find it best to use the Rollo browser extension to download a PDF of the label, then print) but you may find it easier to print directly from the service that you use.

The Rollo usb-connected printer retails for $200.
The Rollo wireless printer retails for $300.

Both printer work with any brand of thermal labels, but you can get 500 Rollo 4x6” labels for $19. Shop here.

Shop Rollo Wired Printer at Amazon
Shop Rollo Wireless Printer at Amazon


Summary

This post has covered just about everything you need to know to get started with packing and shipping fragile objects, along with the tools and materials required to get the job done.

The “double-box” method is what I use and it has never failed me, and it’s what I recommend to anyone packing and shipping ceramics. Just make sure the piece is packed securely and doesn’t move or shake around, and that it is double-boxed with about 4 inches of packing material in every direction.

This method requires boxes, tape, Ranpak Ready-Roll or bubble wrap, and void fill such as starch packing peanuts.

To help complete your shipment, it’s great to have a tape dispenser, shipping scale, and thermal label printer, so that you can prepare your shipment in your workspace, and easily drop it for shipping or have it picked up.

How do you pack and ship fragile objects? Any questions about this process? Let us know in the comments.


In How To Tags shipping, scales, printers, packing peanuts, cardboard boxes
Comment


ABOUT: The Studio Manager is dedicated to sharing the best tips, ideas, and equipment guides for a ceramic, sculpture, painting, or any art studio. Thanks for reading.

For updates and other links, follow on Facebook


POPULAR POSTS
> Pottery Wheel Buyer’s Guide
> Gift Guide for Potters
> Best Dust Masks for Pottery Studios
> Best Cone 6 Glossy Clear Glaze
> Best Aprons for Pottery and Art
> Best Pottery Wheel Stools
> Make a Metal Pottery Rib


Evolution of Pottery t shirt

Evolution of Pottery shirt. Shop at Society 6


POPULAR TOOL REVIEWS
> Pottery Wheel Buyer’s Guide
> Best Pottery Aprons
> Tabletop Wheel Buyer’s Guide
> Best Banding Wheels
> Glaze Mixing Tools and Accessories
> Best Scales for Ceramic Studios


Cat throwing pots on a pottery wheel black and white apron

Pottery Cat apron. Shop at Redbubble.


RECENT POSTS

Featured
aIMG_4951.jpg
Mar 30, 2025
The Best Small, Portable Slab Rollers for Ceramic Studios
Mar 30, 2025
Mar 30, 2025
Best Pottery Wheel Stools
Mar 14, 2025
Best Pottery Wheel Stools
Mar 14, 2025
Mar 14, 2025
The Best Aprons for Pottery, Ceramics, and Art Studios
Mar 13, 2025
The Best Aprons for Pottery, Ceramics, and Art Studios
Mar 13, 2025
Mar 13, 2025
Low Fire Clear Test 1.jpg
Mar 5, 2025
Testing Low Fire Clear Glaze Recipes G1916Q and Duncan 1001 Clear
Mar 5, 2025
Mar 5, 2025
aIMG_2973.jpg
Mar 1, 2025
Best Bats for the Pottery Wheel
Mar 1, 2025
Mar 1, 2025
weighing clay.jpg
Mar 1, 2025
Clay weight for throwing — in ounces and grams
Mar 1, 2025
Mar 1, 2025
The Best Cone 6 Glossy Clear Glaze Recipe
Feb 28, 2025
The Best Cone 6 Glossy Clear Glaze Recipe
Feb 28, 2025
Feb 28, 2025
melted cones.jpg
Feb 28, 2025
Orton Pyrometric Cone Chart in Fahrenheit and Celsius
Feb 28, 2025
Feb 28, 2025
The Best Cut Off Wire for Ceramic Wedging Tables
Feb 27, 2025
The Best Cut Off Wire for Ceramic Wedging Tables
Feb 27, 2025
Feb 27, 2025
Shimpo banding wheel 2.jpg
Feb 27, 2025
The Best Banding Wheels for Pottery and Ceramics
Feb 27, 2025
Feb 27, 2025
Best Masks for Silica Dust in Pottery and Ceramic Studios — updated for 2025
Feb 26, 2025
Best Masks for Silica Dust in Pottery and Ceramic Studios — updated for 2025
Feb 26, 2025
Feb 26, 2025
The Best Scales for Ceramic Studios and Workshops 2025
Feb 23, 2025
The Best Scales for Ceramic Studios and Workshops 2025
Feb 23, 2025
Feb 23, 2025
Alec Soth Sister Corita Rules.jpg
Feb 22, 2025
Alex Soth on Being Goofy, Following Your Ideas, and How Advice is Meaningless
Feb 22, 2025
Feb 22, 2025
Low fire majolica 1.jpg
Feb 18, 2025
Cone 04 Low Fire Majolica Glaze Tests with Oxide Washes
Feb 18, 2025
Feb 18, 2025
Cone 6 white glaze test tiles.jpg
Feb 17, 2025
Cone 6 Midrange White Glaze – modified VC Soft Satin Glossy 1
Feb 17, 2025
Feb 17, 2025

The Studio Manager recommended books at bookshop.org
> Ceramic Technique
> Ceramic Ideas and Inspiration
> Books about Making Art


Kintsugi heart t shirt

Shop Kintsugi Heart T-shirt at Society6


Potter Flames T shirt

Flaming Potter shirt. Shop at Redbubble.


RECENT POSTS
aIMG_4951.jpg
Mar 30, 2025
The Best Small, Portable Slab Rollers for Ceramic Studios
Mar 30, 2025
Mar 30, 2025
Best Pottery Wheel Stools
Mar 14, 2025
Best Pottery Wheel Stools
Mar 14, 2025
Mar 14, 2025
The Best Aprons for Pottery, Ceramics, and Art Studios
Mar 13, 2025
The Best Aprons for Pottery, Ceramics, and Art Studios
Mar 13, 2025
Mar 13, 2025
Low Fire Clear Test 1.jpg
Mar 5, 2025
Testing Low Fire Clear Glaze Recipes G1916Q and Duncan 1001 Clear
Mar 5, 2025
Mar 5, 2025
aIMG_2973.jpg
Mar 1, 2025
Best Bats for the Pottery Wheel
Mar 1, 2025
Mar 1, 2025
weighing clay.jpg
Mar 1, 2025
Clay weight for throwing — in ounces and grams
Mar 1, 2025
Mar 1, 2025
The Best Cone 6 Glossy Clear Glaze Recipe
Feb 28, 2025
The Best Cone 6 Glossy Clear Glaze Recipe
Feb 28, 2025
Feb 28, 2025
melted cones.jpg
Feb 28, 2025
Orton Pyrometric Cone Chart in Fahrenheit and Celsius
Feb 28, 2025
Feb 28, 2025
The Best Cut Off Wire for Ceramic Wedging Tables
Feb 27, 2025
The Best Cut Off Wire for Ceramic Wedging Tables
Feb 27, 2025
Feb 27, 2025
Shimpo banding wheel 2.jpg
Feb 27, 2025
The Best Banding Wheels for Pottery and Ceramics
Feb 27, 2025
Feb 27, 2025
Best Masks for Silica Dust in Pottery and Ceramic Studios — updated for 2025
Feb 26, 2025
Best Masks for Silica Dust in Pottery and Ceramic Studios — updated for 2025
Feb 26, 2025
Feb 26, 2025
The Best Scales for Ceramic Studios and Workshops 2025
Feb 23, 2025
The Best Scales for Ceramic Studios and Workshops 2025
Feb 23, 2025
Feb 23, 2025
Alec Soth Sister Corita Rules.jpg
Feb 22, 2025
Alex Soth on Being Goofy, Following Your Ideas, and How Advice is Meaningless
Feb 22, 2025
Feb 22, 2025
Low fire majolica 1.jpg
Feb 18, 2025
Cone 04 Low Fire Majolica Glaze Tests with Oxide Washes
Feb 18, 2025
Feb 18, 2025
Cone 6 white glaze test tiles.jpg
Feb 17, 2025
Cone 6 Midrange White Glaze – modified VC Soft Satin Glossy 1
Feb 17, 2025
Feb 17, 2025
VL-Whisper.jpg
Feb 8, 2025
2025 Pottery Wheel Buyer's Guide — The Best Wheels For All Studios
Feb 8, 2025
Feb 8, 2025
shimpo-vl-whisper-wheel.jpg
Feb 7, 2025
Pottery Wheel Comparison Chart 2025
Feb 7, 2025
Feb 7, 2025
vl-whisper.jpeg
Jan 30, 2025
Nidec-Shimpo Pottery Wheels Buyers Guide 2025
Jan 30, 2025
Jan 30, 2025
C_wheel_PATH_2012.jpeg
Jan 29, 2025
Brent Pottery Wheels Buyers Guide 2025
Jan 29, 2025
Jan 29, 2025
The Slip image 4.jpg
Jan 29, 2025
Ellsworth Kelly on Drawing Plants and Nature as “The Ultimate Artist”
Jan 29, 2025
Jan 29, 2025
Agnes Martin 1.jpg
Jan 28, 2025
Agnes Martin on “Perfection That Transcends What You See”
Jan 28, 2025
Jan 28, 2025
Jan 17, 2025
Lithium Carbonate for Ceramic Glazes Price Tracker
Jan 17, 2025
Jan 17, 2025
Complete Guide to Low Fire Glaze.jpg
Nov 26, 2024
10 Best New Pottery and Ceramic Books for 2024
Nov 26, 2024
Nov 26, 2024
Arthur Sze cover.jpg
Nov 1, 2024
Two Poems by Arthur Sze
Nov 1, 2024
Nov 1, 2024
My Passport Ultra 1.jpg
Sep 30, 2024
Review: Western Digital My Passport Ultra 5 TB HDD External Hard Drive
Sep 30, 2024
Sep 30, 2024
MSF KR 3.jpg
Sep 27, 2024
Magdalena Suarez Frimkess: The Finest Disregard catalogue
Sep 27, 2024
Sep 27, 2024
aIMG_4484.jpg
Sep 19, 2024
The DIY Ceramics Degree
Sep 19, 2024
Sep 19, 2024
nigerian pottery 1.jpg
Mar 17, 2024
Nigerian Pottery by Sylvia Leith-Ross Book Review
Mar 17, 2024
Mar 17, 2024
kilnwadding_12.jpg
Feb 17, 2024
Kiln Wadding Recipe with Tutorial
Feb 17, 2024
Feb 17, 2024
kurosawa2.jpg
Nov 26, 2023
Akira Kurosawa on Why He Stopped Painting and Entered the Film Industry
Nov 26, 2023
Nov 26, 2023

WHAT IS THESTUDIOMANAGER.COM?
This site is devoted to sharing tips, tricks, recipes, and equipment that will help you in an art studio.

HOW DO YOU MAKE RECOMMENDATIONS?
In the studio, we are endlessly experimenting with equipment, techniques and ways of making. This site is dedicated to sharing that first-hand information, including products, ideas, and methods that will help you in the studio.

WHO ARE YOU?
This site is written by an artist with more than 20 years of experience running academic, community, and professional studios. For more, please visit the about page.

PRIVACY POLICY
This site uses cookies to track if you click on a link via affiliate networks with Amazon, and Blick via CJ Affiliate, and you can opt out of this tracking. For more information, visit the Disclosures and Privacy Policy for this site.

HOW CAN I SUPPORT THIS SITE?
We love comments and suggestions, and are constantly updating the site based on feedback and information that we receive. This site is also supported by affiliate networks, including Amazon, and Blick via CJ Affiliate.

WHY SHOULD I TRUST YOU?
This site is dedicated to sharing information in the clearest way we know how. We never accept payment from product manufacturers. Our revenue is from affiliate networks, such as Amazon and CJ Affiliate. This means that when we recommend a product and link to it, if you click and buy it and keep it, we will get a small percentage of the revenue at no cost to you. Our incentive is to share the best possible information, about a product or in a how-to guide, so that you will visit again.


Copyright © 2019-2025 TheStudioManager.com