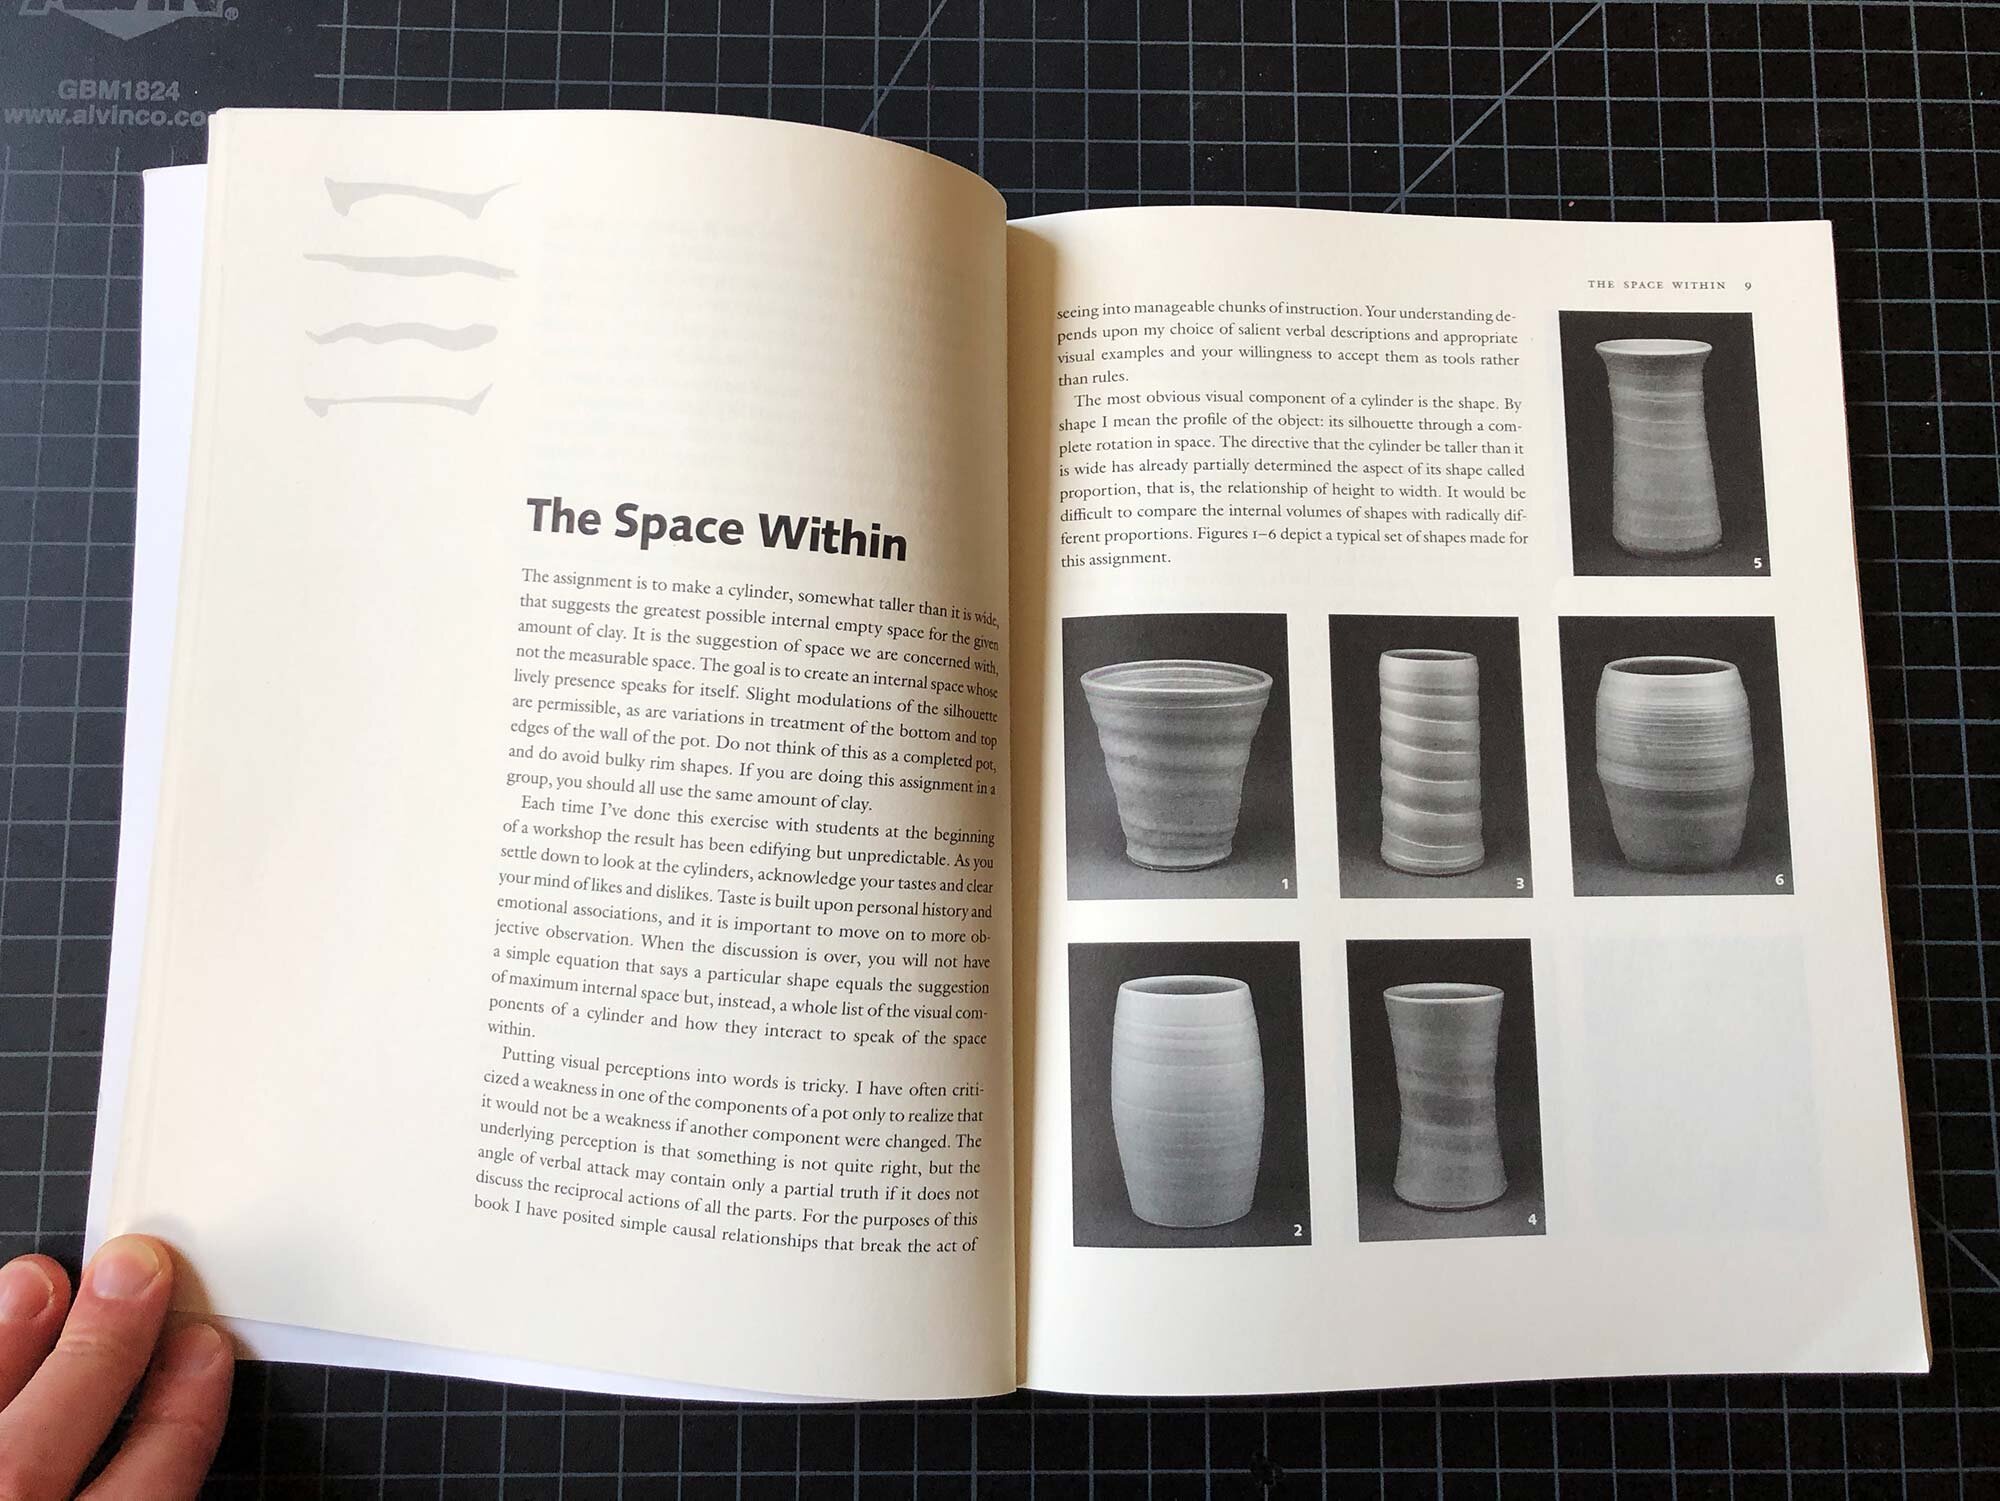
A good cordless drill is a must have in any studio. Between a corded and a cordless drill, I’ll always grab the cordless first. But with numerous options, it can be hard to know where to start in picking a drill. This post will review the best cordless drills for a ceramic or art studio, share my philosophy on how to shop for tools like this, and list a few favorite drill attachments for use in a ceramics studio.
TOP PICK: Milwaukee M12 3/8” Drill/Driver
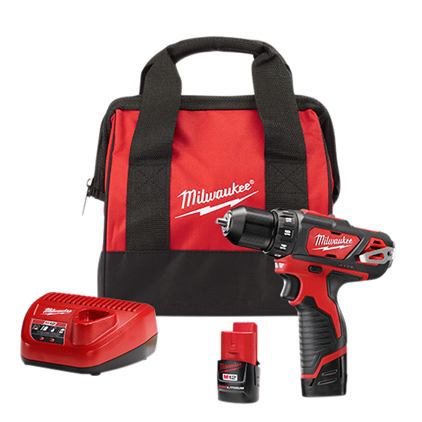
Before jumping into the complete post, the top pick is the Milwaukee M12 3/8” Drill/Driver. It’s a compact, lightweight, and powerful drill that is not too expensive but has excellent build quality. It also has a comfortable grip and the M12 battery system makes it compatible with a huge variety of Milwaukee tools. It’s what I stock and use in my own studio, but the smaller size and light weight make this a drill that can be used by just about anybody.
Table of Contents
Top Pick: Milwaukee M12 3/8” Drill
Runner up: Dewalt 12V Brushless 3/8” Drill
Third Pick: Bosch PS31 3/8” Drill or Bosch PS32 3/8” Brushless Drill
Other Drill Options
Favorite Mixer Blades and other attachments
Cordless vs. Corded Drills
Background and Research
Wrap-Up
Top Pick: Milwaukee M12 3/8” Drill/Driver

The Milwaukee M12 3/8 Drill Driver
The Milwaukee M12 3/8” Drill/Driver is my top pick for a cordless drill, and it’s the drill that I use and stock in my studio. It’s compact and lightweight, but with enough power to really mix a 5 gallon bucket of glaze and just enough power to mix a 10 gallon bucket. The build quality is excellent, and it includes variable speeds, a battery charge light indicator, and the keyless chuck makes it easy to change bits as needed. I use a variety of mixer blades including an ES Jiffy Blade, and this drill can go slow enough to mix a pint jar and is powerful enough to mix 5 or 10 gallon buckets of glaze.

The Milwaukee M12 3/8 Drill Driver Kit
This is the drill that I have stocked in academic and community studios, which are used by scores of students weekly. This drill holds up under those intense conditions. In educational spaces, these tools get used hard and are often subject to misuse, such as splashes of glazes. So far, this drill has survived everything but if it was damaged beyond repair, the basic drill without a battery is especially affordable and would be easy to replace. You can buy just the bare drill with no battery for around $55. The 2407-22 Kit, which includes a drill, charging station, 2 batteries, and bag, costs around $115 at the time of this review. Without a battery, this drill weighs 2.1 lbs.
Additionally, the M12 battery makes this an attractive option if you wanted to use any of the other 100+ Milwaukee tools in the M12 System, such as a jig saw, circular saw, or compact leaf blower.
For extra batteries, definitely get the official Milwaukee brand batters, such as this extended capacity option. Speaking from experience, the generic batteries I tried were completely dead after about 12 months of use.
The drawbacks of this model would be the relative lack of power. It’s not a super-powerful drill, especially for something like a construction job site, but it has enough juice to mix up to 10 gallon buckets of glaze, which is everything I need and might cover your needs too. For an art studio, whether home or educational, this is a great compact drill that does a lot and will last for years. That it has all of this in one of the cheaper models is also the reason why it’s my top pick.
Runner Up: Dewalt 12V Brushless 3/8” Drill/Driver

This is a very compact, powerful drill that does cost more than the top pick but comes with a more powerful and responsive brushless motor. Dewalt tools are always great quality and this one is no exception. Other reviewers love this drill, such as the Wirecutter, which named this their top pick for a small household drill. (And if you’d like to read an explainer on brushless motors, check out this article from Popular Mechanics.)
This kit includes the drill, two batteries, charging station, and a bag. Without the battery, this drill weighs 1.9 lbs. The DeWalt 12V Max battery system includes a variety of tools, including other drills, lights, and sensors, but not as many options as the Milwaukee M12 system.
The flat-bottomed battery that comes with this drill also allows it to stand up. With the Milwaukee, you’d have to order the extended capacity battery for that feature.

DeWalt makes some other entry-level drills that are cheaper than this drill and seem suitable for a studio, but they have very mixed reviews. This model does cost more but the brushless motor should provide more torque and hopefully last longer. The compact size of this drill makes it an attractive option for any studio, as space is always at a premium.
In the end, you have to decide if the extra money for this drill is worth it. It’s a great option and one that I heartily recommend.
Third Pick: Bosch PS31 or PS32 3/8” Drill/Drivers
The third pick is two different Bosch drills that match many of the specifications of the top two picks. The cheaper PS31 model is similar to the Milwaukee M12, and the PS32 option has a brushless motor like the DeWalt. Both are great drills that will work well, depending on your needs and price range.

The Bosch PS31 3/8 Drill kit with drill, two batteries, charger, and case.
Bosch PS31 3/8” Drill/Driver
This compact drill is similar in many ways to the top pick with a 3/8” inch chuck, variable speeds, and the kit comes with two small batteries. Without a battery, the drill weighs 2.1 lbs. This drill was picked by the Wirecutter as the runner up for their best household drill, and it generally has favorable reviews on Amazon and other sites. Some complain about the ergonomics, however, and an uneven balance. But Bosch tools are generally high quality and this drill will do everything you need to do. This is a great drill, but I prefer the Milwaukee for the wider variety of tool options that comes with the M12 system.
Bosch PS32 3/8” Drill/Driver with Brushless Motor

The Bosch PS32 3/8 Brushless Drill Driver kit. Note that the motor area is slightly larger than the Bosch PS31 but the two drills have about the same weight.
The PS32 has many of the same specs and design as the PS31 but is a stepped-up model with a brushless motor that should provide more torque and longer battery life. Head to head, it’s a very similar to the DeWalt drill mentioned above, so choosing this comes down to design and other features. Without a battery, the bare drill weighs 2 lbs and the kit comes with two batteries, charging station, and bag. Personally, I would go with the DeWalt for an entry-level brushless drill but many people love Bosch tools. This PS32 drill was named as a top pick recently by Consumer Reports. It’s not my top pick, but it will do the job for you. Bosch doesn’t have as many tools that use the same batteries in their product line, so if you were looking to start an expandable set of studio tools that utilize the same batteries, you’d want to consider other manufacturers such as DeWalt or Milwaukee.
Other Drill Options
The main thing I use drills for is mixing glazes. All the drills reviewed above will do a great job mixing 1 to 5 gallons of glaze, and they have enough power for a 10 gallon bucket of glaze. But if your studio is full of lots of 10 gallon buckets, you may want to get a more powerful cordless drill, or think about going with a corded drill. In general, these more powerful drills weigh more and the designs get more awkward. You’ll have to think through who is using your studio and if they are able to handle the size of the larger drills.

DeWalt 20V 1/2” Brushless Drill/Driver
For a more powerful cordless drill, the DeWalt 20V Max 1/2” Drill Driver Kit is really great. It’s a step up in power, and will accommodate larger mixing blades. It is quite a bit larger and heavier, weighing 3.4 lbs. This is 1.5 lbs heavier than the DeWalt model reviewed above, but with the heavier weight you will get a larger motor with more power. There’s even an option with bluetooth connectivity, which is mostly useful if you lose your drill or for jobsite inventory management.
Milwaukee M18 1/2” Brushless Drill Driver

The Milwaukee M18 1/2” model is also another powerful cordless drill. The kit clocks in at a lower price than its competitors, but that’s because the kit has just has one battery! So if you go this route, definitely factor in the cost of an extra battery. Battery aside, you’ll get a great drill that packs a punch in a well-built design. Without a battery, this drill weighs 2.5lbs, which is just a half pound more than the M12 model. Milwaukee has been able to squeeze more torque and power into a drill without much added weight.
Milwaukee M18 1/2” Brushless Drill/Driver
Mixing Blades and Accessories for Your Drill
With your drill, you’ll need bits, screws, and mixer blades to put it to work. Here’s what I recommend:
DRILL BITS AND SCREWS
Any quality brand of screws and drill bits should get the job done. But just like drills, there are tons of options out there. Your local hardware store might be the easiest way to see what you need in person, but for shopping online, here are some links:
Drill bits: This basic 14-piece set from DeWalt is a great place to start.
Screwdriver set and bits: This basic set from DeWalt covers all the basics.
DIAMOND BITS

Hollow Core Diamond Drill Bits from Neiko
Diamond bits really help if you are working with glass, tile, hard plastic, or ceramic. For glazed ceramics, diamond bits are your only option for cleanly drilling a hole.
This 5 piece set of diamond-dusted, hollow core bits from Neiko has decent quality despite being less than $10. It will cut holes right through bisqueware (make sure to do it under running water) and it will also work on glazed ware. Just be slow and steady when using these on glazed ware, and use proper protection such as goggles.
SMALL MIXER BLADE
To mix pint jars and small cups, the Jiffy LM10 Mixer Blade is just the right size. It’s 10 1/4” long with a 1 1/4” head.

The small Jiffy LM10 Mixer Blade
MEDIUM MIXER BLADE
For one to two gallons, I prefer a helix mixer designed for 1 gallon buckets. It’s cheaper than a metal blade but it can really mix. As long as you don’t grind the plastic blades against buckets, these economical blades should last for years and also work well for jobs such as mixing plaster.

Helix mixer blade for 1 to 2 gallon buckets
LARGE MIXER BLADE
For 5 or 10 gallon buckets, the Jiffy ES mixer blade is the way to go. It has a 20 1/2” long, 3/8” shaft and the head is 3 3/4” wide.

Jiffy ES Mixer Blade closeup.
Cordless Vs Corded Drills
A corded and cordless drill each have their advantages and disadvantages. I like to have both but most people could get by with just one. If you are looking for a corded drill, check out our recommendations here. Here’s some things to consider when choosing a drill:
Advantages of a Cordless Drill
No cord! You’re free to take the drill anywhere. This is especially good for tight locations, or if it’s not easy to access a power source.
Usually lighter: Cordless drills are designed to be carried around. The models reviewed here are compact and light, which makes these drills more easier to use for everyone.
Good for drilling, but especially good as screwdrivers.
Disadvantages of a Cordless Drill
More expensive: The batteries and charging station add a cost that you don’t have with corded drills.
Less power: Not as much power as a corded drill, and the power may wane as the battery loses charge.
Less torque: This may be good in some cases, such as for use as a screwdriver. But cordless drills are not as good for loosening stuck bolts, or for situations where lots of power or torque are needed.
You will need to stop to change or recharge batteries.
Future expense: batteries wear out and need to be replaced.
More waste: Worn out batteries have to be recycled or disposed.
Considerations for all drills
Keyless or keyed chucks? Generally, a keyed chuck can be locked in super tight, but you’ll need to use (and not lose) the key. Keyless chucks are more convenient but can wear out
How often do you use the drill? If it’s infrequent, you may find that a cordless drill always has a dead battery when you need to use it.
BACKGROUND
I have used tons of different drills over the years, and this review is based on that experience along with looking at many recent reviews of cordless drill reviews and every other source I could find, include user reviews on Amazon and checking out models in person. In the studio, I like to use the best tools at the lowest price. What that means in practice is I avoid the super-cheap brands such as Black and Decker or Ryobi, and will generally choose the base models of top quality brands such as Milwaukee, Bosch, and DeWalt. I totally understand the need for a powerful, $200+ drill for a construction job site. But in my experience, the entry-level drills are powerful enough for most uses, and they are lighter, more compact, and easier for most people to grip. They work for me and I think they’ll work for you too.
Other Considerations when choosing a cordless drill:
Beyond the drill, there are a few other considerations when selecting a cordless drill:
Committing to one company / battery style? Batteries vary by manufacturer, so you may have the option to swap batteries between multiple devices. This can save money, but also locks you in to that brand. Having multiple tools with one model of battery and charger can simplify your life.
Off-brand batteries: These are available for most brands. My advice is to avoid them as they usually wear out faster and don’t hold a charge as long. Be careful of aftermarket kits on Amazon. Many of the cheaper kit options combine brand name drills with cheaper, aftermarket batteries.
Size of the chuck and what attachments you will be using. What kinds of mixer blades and bits will you be using? Make sure they will fit the drill. The drills reviewed above usually have a 3/8” chuck. Only rarely have I needed a 1/2” chuck to accommodate larger shaft sizes.
Wrap-Up
This post covered top picks for cordless drills, as well as some useful tools and accessories. My top pick was the Milwaukee M12 3/8” Drill/Driver. It’s a well-made drill that is versatile, comfortable, lightweight, and is still powerful enough for most uses. With this drill, I keep a variety of mixer blades, as well as drill bits, screwdriver bits, and hollow-core diamond bits.
A cordless drill is a vital tool in the studio. What do you like to use? Let us know your favorite models and accessories in the comments.